Jan 31, 2010

Guiltless Chocolate Chip Cookies


Throughout this entire process of learning to cook, I have, indeed, gotten better. I can now caramelize shallots, stuff a chicken breast and roast garlic with results that have me seriously questioning ever wasting money at restaurants again. But there's still one thing that continues to be a thorn in my side. And that, my friends, is baking. More specifically, cookies. 

I follow the recipes to a T. I peer into the oven while they bake like an overprotective mom. But still, out of all the batches I've made, I somehow managed to screw up each and every one of them. 

I made the chocolate spiderweb cookies too crunchy and the icing too thick. The dough was entirely too sticky to roll for the raspberry strippers. All kinds of problems with the lemon-honey drop cookies left them bottomless. I kept the chewy chocolate cherry cookies in the oven far too long. And as for these chocolate chip cookies,  I think "raw" sums it up best.

What's wrong with me? Is their lightness to blame? Their lack of exuberant amounts of butter and sugar? Are there hidden cookies codes out there that I'm unaware of? Did my mom simply fail to pass down the cookie gene to me?

If you know the answer, please enlighten me. Cookies are so quick and tasty that I just can't bare to give up on them. But at this moment, I'm considering making only cake from this point on, as it has proven to be the one dessert I can't seem to screw up. (Don't even get me started on my problems with pie.)

But for now, here's one more sad defeat. But let the record show that even though the score is an embarrassing 5:0, most of those cookies tasted alright regardless of their flaws, so all was not (totally) lost.


Things started out normal. Butter, sugar, flour, eggs, vanilla, chocolate chips. All expected ingredients. Sure, there was a lot less of each when compared to the contents of a Mrs. Fields or Otis Spunkmeyer creation, but at least they all made an appearance.


Scooping them was easy enough. The recipe makes close to 50 cookies, so it took a little time and about four cookie sheets, but all worth it for a nice stock of yumminess. Or so I thought.


Alas, it was the baking that did me in. In fear of overcooking the cookies, which I so often do, I took them out a little early. Because I was not going to be defeated by an over-crunchy, dry cookie ever again! No, these chocolate chip cookies were going to be my victory! The end of my cookie curse! 

But what I expected to be ooey-gooey awesomeness turned out to be a slightly hardened piece of raw cookie dough. Don't be fooled by their beautiful outward appearance. In fact, they were so raw that they were literally dripping through the wires of my cooling rack. So in a frantic dash I flung them back on the baking sheets until they were solid. Then I let them cool. Then I tasted. Then I cried.


Once I got past the undone middle, the cookies actually had a decent taste for being guiltless. Although, the fact that I ruined them still left me feeling quite guilty. Maybe one day I'll learn to conquer the cookie. But for now, nothing drowns out the taste of defeat like a nice glass of ice cold milk.


(Guiltless) Chocolate Chip Cookies
Cooking Light, June 2007
Yield: 4-dozen (serving size: 1 cookie)

Cookbook Note: Store up to one week in an airtight container--if they last that long. We suggest keeping a dozen in the freezer for emergencies.

Ingredients:
2 1/4  cups  all-purpose flour (about 10 ounces)
1  teaspoon  baking soda
1/4  teaspoon  salt
1  cup  packed brown sugar
3/4  cup  granulated sugar
1/2  cup  butter, softened
1  teaspoon  vanilla extract
2  large egg whites
3/4  cup  semisweet chocolate chips
Cooking spray

Preparation:
Preheat oven to 350°.

Lightly spoon flour into dry measuring cups; level with a knife. Combine flour, baking soda, and salt, stirring with a whisk.

Combine sugars and butter in a large bowl; beat with a mixer at medium speed until well blended. Add vanilla and egg whites; beat 1 minute. Add flour mixture and chips; beat until blended.

Drop dough by level tablespoons 2 inches apart onto baking sheets coated with cooking spray. Bake at 350° for 10 minutes or until lightly browned. Cool on pans for 2 minutes. Remove from pans; cool completely on wire racks.

Nutritional Information: Calories: 88 (31% from fat), Fat: 3g (sat 1.8g,mono 0.5g,poly 0.1g), Protein:1g, Carbohydrate: 14.6g, Fiber: 0.2g, Cholesterol: 5mg, Iron: 0.4mg, Sodium: 56mg, Calcium: 5mg.

Jan 30, 2010

Thai Curry Coconut Shrimp


When it comes to dinner, it doesn't take a whole lot to impress me. I don't need a three-page wine list or an origami napkin. Just give me a heaping plate of spicy Thai noodles and a comfy booth and I'm one happy camper. 

But I haven't always been so passionate about bean sprouts and curry. I think my husband says it best in his "The Onion"-esque faux news headline: "American survey concludes best Chinese food is Thai." That was me alright. I thought the two were interchangeable, cuisine wise, which left me frustrated as I could never find any sweet 'n sour chicken.

I remember asking a server once if I could get the pad Thai, only with fried chicken. And also, if they had any egg rolls around, because I didn't see them on the menu. She responded with a dirty look and a "We don't serve fried here. That's Chinese. This is Thai." I was embarrassed, but most of all, sad that I'd be eating chicken in its un-fried state.

But after a few tastes of the ultra spicy food, I came to love it, and Thai food is now one of my favorites of all time, totally trumping Chinese. Nothing beats the smooth, creamy taste of peanut butter and coconut milk mingling with the heat of curry.  

In fact, one of the first things my husband and I did when we moved to Michigan was scout out a good Thai place to call home. And that we did. Now any night of the week, for around 13 bucks, we can get our fill of chicken curry noodles, Curry duck and crab cheese, and still leave with three days worth of leftovers. It's amazing. I've even started experimenting with recipes online to recreate my usual order because I can't get enough.

But alas, while the peanut butter and coconut milk bring joy to my heart, they only bring inches to my thighs and guilt to my soul. So last week I searched for a Cooking Light Thai recipe that would offer some balance. Which brings me to today's post.

One thing about making Thai, I've discovered, is the simplicity. This dish in particular is all made in one pan, aside from the rice, and the prep is minimal – just a little onion and herb chopping. And there are only nine ingredients and six directions. Love it!


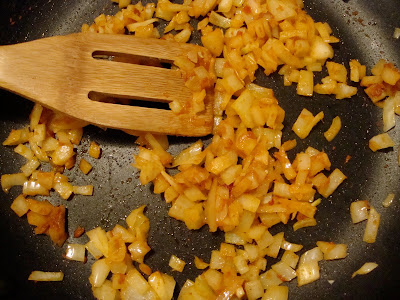
I started by sautéing the onion and curry together, adding in a little Thai chili sauce I use in another recipe. (We like it hot around here.) Then I added in the sugar, shrimp, coconut milk and fish sauce. 


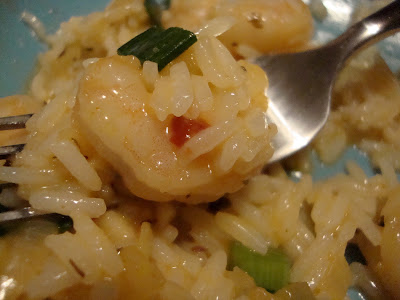
Pre-cooked frozen shrimp and dried basil (store was out of fresh) saved me even more time, so in a matter of minutes my creation was ready to be tossed with fresh herbs and poured into our bowls over jasmine rice.  


As a light dish, it was great. As a Thai dish, it seemed to be missing something. I think it might have been the fat content. You can thank the light coconut milk for that, which is much thinner. So if you're determined to get that thick, creamy full-fat sauce, this won't quite produce it. But if you want Thai taste at a fraction of the fat and calories, this here is a winner.

It was pretty tasty. I think next time I may try to thicken the sauce a bit, add a little more curry and make sure I find fresh basil. And maybe add some full fat coconut milk, peanut butter, brown sugar and....just kidding. I'll try to keep it light. Unless of course I find a good recipe for egg rolls.


Thai Coconut Curry Shrimp
Cooking Light, September 2008

Yield: 2 servings (serving size: 1 cup)

Cookbook Note: Red curry paste conveys plenty of spicy heat, so a little goes a long way. Feel free to add a bit more to increase the heat, or omit the paste to tame the dish. The addition of slightly sweet coconut milk smooths out the flavors. Total time: 19 minutes.

Ingredients:
1  teaspoon  canola oil
1/2  cup  chopped onion
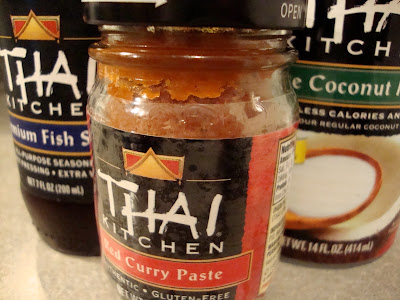
1/4  teaspoon  red curry paste (such as Thai Kitchen) (I added a little more)
1  teaspoon  sugar
12  ounces  large shrimp, peeled and deveined
1/3  cup  light coconut milk
2  teaspoons  fish sauce
1/4  cup  chopped green onions
1  tablespoon  chopped fresh basil

Preparation:
1. Heat oil in a large nonstick skillet over medium-high heat. Add onion and curry paste to pan, and sauté 1 minute, stirring occasionally. Stir in sugar; sauté 15 seconds. Add shrimp; sauté 3 minutes or until shrimp are done, stirring frequently. Stir in coconut milk and fish sauce; cook 30 seconds or until thoroughly heated. Remove from heat; stir in green onions and basil.

Nutritional Information: Calories: 255 (26% from fat), Fat: 7.4g (sat 2.6g,mono 1.8g,poly 1.9g), Protein: 36.1g, Carbohydrate: 10.2g, Fiber: 1.1g, Cholesterol: 259mg, Iron: 4.6mg, Sodium: 740mg, Calcium: 111mg.

Jan 25, 2010

Banana Coffee Cake w/ Macadamia Nuts and Coconut

I think mornings are the best part of vacations. First you sleep in until the afternoon sun wakes you. Then you venture on a pajama clad stroll to the sofa to enjoy a thick slice of coffee cake and some good conversation. And finally, you tortuously plan your oh-so-hard day of relaxing and indulging.

Unfortunately, I am no longer on vacation.

But who says I can’t at least have the coffee cake? Especially one that doesn't cost an arm and a leg while at the same time adding to my midsection. So instead of making a dessert last week, I decided to sweeten up my mornings (which can always use a little sweetening) with this breakfast beauty. Bananas. Macadamia nuts. Coconut. Seriously, you can't go wrong.

The recipe was extremely simple, so I'll just get to the point. First, the bananas. Unfortunately, I've been sick, so my bananas were getting dangerously over ripe before I had the chance or the energy to make the cake. So into the freezer they went.

When I regained my strength, I let the bananas thaw on the counter, snipped off the ends and squirted them out like toothpaste. Gross description, I know, but quite convenient. The freezing made them very soft, so the mixing process was a breeze. There was a little extra moisture inside the peel, but I drained it out and that was that.


Once everything was mixed together, I baked the cake, chopped and toasted the macadamia nuts and prepared the topping, which I ended up doubling. A few online reviewers suggested doing so, and even though a move like that meant more calories, I followed suite. Hey, isn't breakfast supposed to be the biggest, most satisfying meal of the day? And I've yet to meet the man who doesn't consider butter, brown sugar and coconut to be satisfying.


Everything came together wonderfully. The cake was moist and full of flavor, very similar to banana bread, and the topping was sweet, crunchy and delicious. It was a bit thicker than the cookbook picture, but I blame myself and my extra liberalness with the nuts and coconut. My only piece of advice: ice cold milk is to this cake as fine wine is to a fancy steak dinner. It's a necessary complement. Or a cup of Joe, of course.

So, maybe this coffee cake wasn't as indulgent as a cheese danish or a big fat bear claw, but it was still a wonderfully sweet way to start the day. And with freezing temperatures, dark skies and cold floors, that's something I'll always welcome to my breakfast table.


Banana Coffee Cake w/ Macadamia Nuts & Coconut
Cooking Light, November 2002
Yield: 12 servings (serving size: 1 wedge)

Cookbook Note: Substitute pecans if you don't have macadamia nuts.

Ingredients

Cake:

Cooking spray
1 1/3  cups  all-purpose flour
1/2  teaspoon  salt
1/2  teaspoon  baking powder
1/4  teaspoon  baking soda
1  cup  mashed ripe banana (about 2 large bananas)
3/4  cup  granulated sugar
3  tablespoons  vegetable oil
1  teaspoon  vanilla extract
1/4  teaspoon  ground nutmeg
1  large egg

Topping: (I doubled the below recipe)
1/4  cup  packed dark brown sugar
1  tablespoon  water
2  teaspoons  butter
2  tablespoons  chopped macadamia nuts, toasted
2  tablespoons  flaked sweetened coconut

Preparation:
Preheat oven to 350°.

Coat a 9-inch round cake pan with cooking spray; line bottom of pan with wax paper. Coat wax paper with cooking spray.

Lightly spoon flour into dry measuring cups; level with a knife. Combine flour, salt, baking powder, and baking soda in a bowl, stirring with a whisk. Combine banana and next 5 ingredients (banana through egg) in a bowl; beat with a mixer at medium speed for 1 minute or until well blended. Add flour mixture to banana mixture, and beat until blended. Pour batter into prepared pan.

Bake at 350° for 30 minutes or until a wooden pick inserted in center comes out clean. Cool in pan 10 minutes on a wire rack; remove from pan. Carefully peel off wax paper.

Combine brown sugar, water, and butter in a small saucepan; bring to a boil. Cook 1 minute, stirring constantly. Remove from heat; stir in nuts and coconut. Spread over cake. Serve cake warm.

Nutritional Information: Calories: 189 (28% from fat), Fat: 5.8g (sat 1.4g,mono 1.9g,poly 2.1g), Protein: 2.3g, Carbohydrate: 32.6g, Fiber:1g, Cholesterol: 19mg, Iron: 0.9mg, Sodium:159mg, Calcium: 22mg.
Jan 22, 2010

Chicken Tamale Casserole


So lately I’ve been sick. Really sick. So sick that I haven’t had an appetite. And that, my friends, is something serious.

See, I’m the kind of person who eats before and after roller coasters, knowing full well the consequences. And the kind of person who continues hand-to-mouth maneuvers up to 30 minutes after I become full. So if my appetite suddenly goes missing, you can be sure that something scared it away.

This time, it was a dizzy/weak/overly-medicated daze that plagued me for about a week and a half, with the added perk not being able to breath out of my left nostril, even though I blew through about 300 tissues a day.

I know this is probably not the most palatable intro to a recipe. But it’s the sole reason I strove to find a simple meal with no lengthy preparation, stacks of dirty dishes or hard-to-find ingredients. Just something my hubby could shop for and I could throw together.
   
And here it is, by far one of the simplest things I’ve made since I started this project. It’s a casserole, after all. But the thing about this casserole is that there aren’t any crushed cornflakes or French fried onions or cans of Campbell’s cream of cheating soup. Not that I couldn’t go for a big batch of buttery corn flake-crusted cheesy potatoes. But I was drawn to this recipe’s unique tamale-inspired ingredients and the fact that it's one of the most sought after Cooking Light recipes. (182 reviews on myrecipes.com!)

So, earlier in the day, I baked a pan of chicken breasts, shredded them and set them aside. A fair warning: shredding chicken takes a little time. You literally have to pull bits and pieces away from the chicken over and over. And over.

Of course, I personally tried to do this while balancing the phone between my shoulder and chin so I could complain about my cold to my mom. And I made a double batch so we could have chicken salad for lunches. And, I may be exaggerating just a little. But still. It had me doubting homemade pulled pork in the near future.


When we were ready to eat, I mixed all the ingredients for the cornbread, including green chiles, creamed corn, cheese, cumin and red pepper, and baked it.

A few minutes later, I pierced the cornbread with a fork, poured on the enchilada sauce and topped with chicken and cheese, which I have to admit, I was a little generous with. You gotta get your protein, right? A few more minutes in the oven and it was golden and bubbling.


It was great to be able to dress up a casserole with things like sour cream and fresh cilantro. Helped it not look like the beige slop most casseroles turn into. A little side salad and we were ready to eat.


Overall, it was pretty good, especially for being so simple. But while the topping was delish, the chile cornbread was a little too sweet and mushy for my liking. Maybe I didn’t bake it long enough.  If I make this again, I may try to alter it a bit. Wait…I don’t know how to alter recipes. Who do I think I am?! Anyone out there know how to de-sweeten cornbread mix and keep it from getting too soft? Maybe less fork stabbing? (I did take off a little steam on the poor thing.)

My husband, on the other hand, loved it. I mean, he really loved it. That’s why I almost hate to even write about the taste, because like I said, I had no appetite. Filet Mignon was as good as raw eggs to me. Literally, I craved nothing but these cheap, cracker-thin frozen pizzas from Kroger. And I couldn’t even taste those.

I wanted to try some of the leftovers a couple days later when my love for food returned, but alas, my husband had scarfed down the rest of the pan. I should have let him write the review. But, I guess the fact that he ate the entire thing says enough in itself. So let’s just take his word for it.


Chicken Tamale Casserole
Risë Minton, Cooking Light, November 2008
Yield: 8 servings

Ingredients:
1  cup  (4 ounces) pre-shredded 4-cheese Mexican blend cheese, divided
1/3  cup  fat-free milk
1/4  cup  egg substitute
1  teaspoon  ground cumin
1/8  teaspoon  ground red pepper
1  (14 3/4-ounce) can cream-style corn
1  (8.5-ounce) box corn muffin mix (such as Martha White)
1  (4-ounce) can chopped green chiles, drained
Cooking spray
1  (10-ounce) can red enchilada sauce (such as Old El Paso)
2  cups  shredded cooked chicken breast
1/2  cup  fat-free sour cream

Preparation:
Preheat oven to 400°.

Combine 1/4 cup cheese and next 7 ingredients (through chiles) in a large bowl, stirring just until moist. Pour mixture into a 13 x 9–inch baking dish coated with cooking spray.

Bake at 400° for 15 minutes or until set. Pierce entire surface liberally with a fork; pour enchilada sauce over top. Top with chicken; sprinkle with remaining 3/4 cup cheese. Bake at 400° for 15 minutes or until cheese melts. Remove from oven; let stand 5 minutes. Cut into 8 pieces; top each serving with 1 tablespoon sour cream.

Nutritional Information: Calories: 354 (36% from fat), Fat: 14.1g (sat 7.1g,mono 3.3g,poly 1.2g), Protein: 18.9g, Carbohydrate: 36.3g, Fiber: 2.5g, Cholesterol: 58mg, Iron:1.7mg, Sodium: 620mg, Calcium:179mg.

Jan 18, 2010

Cappuccino Cheesecake with Fudge Sauce


Ever wonder what would happen if Starbucks and The Cheesecake Factory hooked up? Say…on your counter top? Well, wonder no more. I’ve discovered nothing less than their lovechild.

For our last few days with family in Florida, I saw it only fitting to make something indulgently delicious to remember our stay. So we welcomed the New Year with this coffee, chocolate and fudge-lover’s dream dessert. It was my first stab at cheesecake, and I must admit, I was a bit nervous. Cheesecake seems so delicate. But I was pleasantly surprised by its simplicity. Although, I’m sure that having my mom’s stand mixer and infinite knowledge of baking by my side helped just a bit.

Now if you read my previous post, you know I was in no mood to bake on New Year's Day.  I was exhausted. But I was also on a mission. A mission that, once completed, promised lots of dark chocolate fudge sauce. So we strapped on our aprons, wiped our drool off the recipe and got to work.

First was the crust, which sadly forced me to crush dozens of innocent teddy grahams. Quite a cruel task. But for the sake of an amazing cheesecake, I pressed on. (Pun absolutely intended.) After patting the crumbs, butter and sugar into the pan, it was ready to be baked. (Which we unknowingly overlooked and skipped. Luckily, no harm was done to the final product.)


The cheesecake layer was next, and was an effortless step with just a bit of measuring and pouring. Although a warning: Don’t premix ingredients unless the recipe so instructs. I mixed the espresso powder, vanilla and cinnamon together before adding them to the batter. But before I got the chance, they formed into a rock-hard piece of candy that took quite a bit of extra time to break up in the mixer.

And by the way, if you try this recipe and have trouble finding instant espresso powder, Target sells little packets of Starbucks instant extra bold coffee. (You'll need two.) I discovered these after endless searching when I made the chocolate lava cakes. And I highly recommend espresso over instant coffee if you want a prominent coffee flavor.


Appropriately, the most delicious step came last. The step that allowed me, without guilt, to dig a spoon deep into a jar of dark chocolate fudge sauce. And I tell you, it took all my courage not ditch the swirls and instead scarf down the entire jar right then and there. But my family was grateful that I controlled my cravings, spared the cheesecake, and added the final touch to my creation. I think my husband was the most grateful, because at the end of this step, he got to lick the spoon clean. And the measuring cup. And the knife.


A little over an hour later, our cheesecake was done. It cracked a bit in the middle, which was supposedly normal, and actually looked kinda neat. After cooling, into the fridge it had to go for…gasp….eight hours. There was NO way we could all wait that long. You try telling three grown men and two chocolate-obsessed woman they have to wait until midnight to enjoy a cheesecake that's sitting in the fridge two feet away.


When we could take it no longer, I sliced it up, drizzled on the sauce, and in a matter of minutes, our mouths were stuffed with cappuccino cheesecake, and our lips were covered in fudge. It would have been even better if we chilled it for the full eight hours, but...it was simply delicious. Seriously, were you expecting me to say otherwise?


Luke and I each ate one piece, but unfortunately, the next night was our last night in Florida, and we ate out with friends. Could we seriously leave with only one taste? No way. So after a big breakfast Sunday morning, just minutes before we headed for the airport, we scarfed down one more. Nothing like a little fudge sauce in your teeth to make the bitter goodbyes a little more sweet.


Cappuccino Cheesecake with Fudge Sauce
Cooking Light, September 1999
Yield: 16 servings

Ingredients:
1 1/2  cups reduced-fat chocolate wafer crumbs (about 50 cookies)
3  tablespoons  butter or stick margarine, melted
2  tablespoons  sugar
Cooking spray
1  cup  sugar
3  tablespoons  all-purpose flour
2  (8-ounce) blocks fat-free cream cheese
2  (8-ounce) blocks 1/3-less-fat cream cheese
2  large eggs
2  large egg whites
2  tablespoons  instant espresso or 1/4 cup instant coffee granules
1  teaspoon  vanilla extract
1/2  teaspoon  ground cinnamon
1 1/2  cups  fat-free hot fudge topping, divided

Preparation:
Preheat oven to 325°.

Combine first 3 ingredients in a small bowl; firmly press mixture into bottom of a 9-inch springform pan coated with cooking spray. Bake at 325° for 10 minutes; cool on a wire rack.

Preheat oven to 450°.

Place 1-cup sugar, flour, and cheeses in a large bowl; beat at medium speed of a mixer until smooth. Add eggs and egg whites, 1 at a time, beating well after each addition. Add espresso, vanilla, and cinnamon; beat well. Pour cheese mixture into prepared crust; spoon 4 mounds of fudge topping (2 tablespoons each) onto cheese mixture; swirl mixtures together using a knife. Bake at 450° for 10 minutes. Reduce oven temperature to 250° (do not remove cheesecake from oven); bake an additional 1 hour or until almost set. Remove cheesecake from oven, and cool to room temperature. Cover and chill at least 8 hours.

Drizzle 1 tablespoon fudge topping onto each of 16 plates; top each with 1 cheesecake wedge.

Nutritional Information: Calories: 313 (30% from fat), Fat: 10.3g (sat 5.9g,mono 3g,poly 0.7g), Protein: 9.9g, Carbohydrate: 44.1g, Fiber: 1.1g, Cholesterol: 60mg, Iron: 0.7mg, Sodium: 468mg, Calcium: 130mg.
Related Posts with Thumbnails