Feb 28, 2010

Breakfast Coffee Cake


I hate mornings. Seriously hate. There's nothing worse than being forced out of a warm cocoon of happy dreams and soft sheets by a blaring alarm clock. And for what? Cold floors and morning breath? I'd rather stay in bed.

But alas, I am a girl. And if I'm going to step out into the world, a girl's gotta do what a girl's gotta do. Shave. Curl. Polish. Pluck. Tuck. Conceal. Spray. Spritz. Straighten. Fasten. Secure. Oh yeah, and then there's the whole war over what to wear. And after all of that, I'm supposed to have time to whip up an omelet and sit down and eat it? Ha.

On those rare mornings when I actually do manage to get food in my belly, it's something I can eat in the car, like a dry waffle or toast. Or, if we've recently gotten groceries, you may even find a collection of yogurt-covered spoons in the glove compartment or a banana peel in the cup holder.

I know what you're thinking. "Just get up earlier, lazy butt." I've tried that. But when I know that I have a few extra minutes, I waste them perfecting my eyeliner and straightening every last hair and before I know it, I'm once again starting the day off starving. And exhausted.

But friends, I've found a delicious solution. One that allows me to continue to sleep until the last possible second and still start the day with something special. With this recipe, breakfast is no longer an afterthought.

After making the ever-so-delectable banana coffee cake with macadamia nuts and coconut, I was intrigued to make another breakfast confection. And this time, I found one that's easier, cheaper, quicker, and tastier. Yes, tastier!

There's really nothing to it. I simply mixed up a quick cake batter and a Grape Nut-cinnamon-brown sugar-espresso swirl, layered them and baked.


When it cooled, I iced this puppy with a coffee-flavored glaze. It's very mild on the coffee flavor, though, so you don't have to be an addict to enjoy it.


And there you have it.  A soft, gooey slice of coffee cake dripping with icing and swirled with cinnamony-sweet goodness. Way better than those $10 rips offs from bakery and much tastier than a Tupperware bowl of milk-less cheerios or a cold Pop Tart. 

I suggest you pair it with an ice cold glass of milk and a warm car seat. Trust me, it's so good, it'll make even a Monday amazing. Or at least help it start out that way.


Breakfast Coffee Cake
Cooking Light, August 2006
Yield: 12 servings (serving size: 1 piece)

Ingredients:

Swirl:
1 1/2  cups  granulated sugar, divided
1/2  cup  nutlike cereal nuggets (such as Grape-Nuts)
2  teaspoons  instant espresso granules
1  teaspoon  ground cinnamon

Cake:
1 3/4  cups  all-purpose flour (about 7 3/4 ounces)
1  teaspoon  baking soda
1/2  teaspoon  baking powder
1/2  teaspoon  salt
1  cup  vanilla fat-free yogurt (about 8 ounces)
1/2  cup  butter, softened
1/2  cup  egg substitute
Cooking spray

Icing:
1 1/2  cups  powdered sugar, sifted
2  tablespoons  cooled brewed coffee

Preparation:
Preheat oven to 350°.

Combine 1/2 cup granulated sugar, cereal, espresso granules, and cinnamon in a small bowl; stir with a whisk. Set aside.

Lightly spoon flour into dry measuring cups; level with a knife. Combine flour, remaining 1 cup granulated sugar, baking soda, baking powder, and salt in a large bowl. Add yogurt, butter, and egg substitute; beat with an electric mixer on low speed 1 minute or until combined. Spread half of batter into an 8-inch square baking dish coated with cooking spray. Sprinkle with cereal mixture; top with remaining half of batter. Bake at 350° for 45 minutes or until a wooden pick inserted in center comes out clean; cool in pan.

Combine powdered sugar and coffee in a small bowl; spread glaze evenly over top of cake. Cut into 12 pieces.

Nutritional Information: Calories: 321 (22% from fat), Fat: 7.9g (sat 4.9g,mono 2g,poly 0.4g), Protein: 4.6g, Carbohydrate: 59.4g, Fiber: 1g, Cholesterol: 20mg, Iron: 2.5mg, Sodium: 342mg, Calcium: 61mg.
-----------------------------------------------------------------------------------------------------------------

Feb 25, 2010

Turkey & Basil Calzones


I just love a good 'ol slice of greasy pizza. I'll take that over lobster any day. But sometimes, there isn't enough cash to throw down for delivery (a.k.a. Dave Ramsey won't let me), and braving the blizzard is just too much to ask when I'm all cozy on the couch.

What to do, what to do…make my own pizza? Nope. Something better. Get all fancy shmancy and make my own calzone! Ok so it's not really fancy. But it is quick, easy and delicious. Three words that pair perfectly with Friday night and sweatpants. This is all it takes:

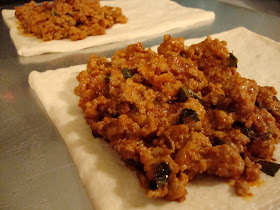
First, I browned a pound of ground turkey along with some minced garlic, which smelled wonderful. Then I added tomato-basil pasta sauce and crushed red pepper flakes and let it simmer, which smelled even more wonderful. Then mixed in fresh basil (wonderful again) and set aside. At that point, I was halfway done. Man, I love this dish.


While the filling cooled, I prepared the crust. Don't you just love refrigerated dough? Maybe it doesn't make the yummiest, most authentic, straight-from-Grandma's-oven creations, but it sure makes things easier. Don't get me wrong. I have every intention of weaning myself off of the cardboard can. But a recipe this simple deserves to stay that way.

So out came the mysteriously preserved log of dough. I unraveled it, formed four sections and filled each with meat and mozzarella. It works best if you keep the filling on one half of the dough so nothing spills out when you fold it over.

Important tip: Don’t make your calzones on top of your pre-heating oven. Turns out dough can melt, which makes this process a little bit harder. Like trying to stuff meat sauce into peanut butter. Yeah. Thankfully, the taste wasn't ruined. And even more thankfully, the recipe's simplicity allowed for a re-do later in the week, hence the lovely un-melted photos.


After 12 minutes in the oven, I had four piping-hot calzones and one majorly drooling husband. They were delicious. A perfect little pizza pocket filled with lots of saucy, spicy, cheesy goodness. I totally forgot I was eating turkey. It tasted more like spicy beef. (I did add a bit more red pepper than the recipe called for, and I recommend it.)

With my first bite, I thought it was going to be a little too much food for one person. I told the hubs he may have to finish mine. But as I was rounding bite 15, I began instinctively hovering over my food while shooting death stares at my husband's "done yet?" looks.


With only eight ingredients and a few simple steps, this is one of those dishes I can whip up on a minute's notice. So sorry, Pizza Hut. I've got a hot new Friday night date.


Turkey & Basil Calzones
Cooking Light, December 2008
Yield: 4 servings (serving size: 1 calzone)


Ingredients:
Cooking spray
2  garlic cloves, minced
1  pound  ground turkey breast (original recipe called for ground chicken)
3/4  cup  prepared pizza sauce
1/4  teaspoon  crushed red pepper (I added a bit more)
1/4  cup  chopped fresh basil
1  (13.8-ounce) can refrigerated pizza crust dough
1/2  cup  (2 ounces) shredded part-skim mozzarella cheese

Preparation:
Preheat oven to 425°.

Heat a large nonstick skillet over medium-high heat. Coat pan with cooking spray. Add garlic and chicken to pan; sauté 5 minutes or until chicken is no longer pink, stirring to crumble. Stir in pizza sauce and pepper. Reduce heat, and simmer 5 minutes, stirring occasionally. Remove from heat; stir in basil. Let stand 10 minutes.

Unroll dough onto a baking sheet coated with cooking spray; cut dough into quarters. Pat each portion into an 8 x 6–inch rectangle. Divide chicken mixture evenly among rectangles; top each serving with 2 tablespoons cheese. Working with one rectangle at a time, fold dough in half over filling, pinching edges to seal. Repeat procedure with remaining rectangles. Bake at 425° for 12 minutes or until golden.

Nutritional Information: Calories: 459 (14% from fat), Fat: 7.1g (sat 1.8g,mono 1g,poly 0.4g), Protein: 39.1g, Carbohydrate: 56.4g, Fiber: 3g, Cholesterol: 74mg, Iron: 3.7mg, Sodium: 919mg, Calcium: 111mg.
-----------------------------------------------------------------------------------------------------------------

Feb 21, 2010

One-Bowl Chocolate Mocha Cream Cake


Dear Betty Crocker,

I win. 

Sincerely,
Victorious made-from-scratcher

For years I've been misled to think that a delicious, out-of-this-world dessert meant breaking the bank at a bakery. Hoodwinked to think that a quick cake at home meant a box of boring powder and a can of fake frosting.

Well, the wool has been pulled from my eyes, my friends. I just made one of the best chocolate cakes I've ever had, all in one bowl, in a matter of minutes. And it was fudgy. And rich. And had the most amazing fluffy mocha cream that by far beats anything you'll find on a shelf. So Betty can take her highly overrated, preservative-packed short cut crock and shove it. And I mean that in the nicest way possible.

In case you couldn't tell, I'm in LOVE with this cake. But who wouldn't fall head over heels for an indulgent, moist, espresso chocolate cake that's packed with chocolate chips, topped with cool mocha cream and drizzled with chocolate sauce? I knew my husband would for sure. When I asked him what kind dessert he'd like for his birthday, he blurted an ecstatic "chocolate!" before I even finished the question.

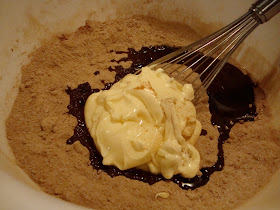
Actually, it was so simple to make, he probably could have made it for himself. (Uh, probably.) It really did only take one bowl. I simply mixed a little flour, cocoa, coffee, low-fat mayo and the usual baking suspects together, and in no time I had a rich batter ready to be baked.


Thirty minutes later our entire apartment smelled like coffee and chocolate. Definitely better than any candle or plug-in I had sitting around.


Once the cake was completely cooled, I mixed up the marvelous mocha topping, which is really just instant coffee combined with an entire jar of marshmallow fluff and an entire container of whipped cream. Translation: you'll want to eat the entire bowl with a spoon.


It really is that good. So light and fluffy with just a touch of mocha flavor. Kinda like the frothy whipped cream that sits atop your Starbucks mocha late, soaking in all that great coffee flavor. I mean, I eat that with a spoon all the time. Or a straw, or a finger. Depends on who's looking.


I let it chill for a couple hours while we ate our homemade sushi, then sliced it up and drizzled on the chocolate. You're supposed to add the chocolate sauce before you cut the cake, but I wanted to keep each piece looking pretty, so I did it after.

And I didn't bother measuring out the chocolate sauce, either. I mean, it was Luke's birthday, and I wasn't going to make him (or me) count calories in his bday cake. (But on a side note, you don't even need the sauce. We left it off of our leftover cake and never missed it.)


As I mentioned before, the cake is downright  delicious. It combines the rich fudginess of the hot chocolate fudge cakes with the cool, whipped lightness of the better than sex cake, then adds mocha and chocolate chips to make it a celebration-worthy confection.

Luke said it was a little sad to wash the empty pan after the last piece because he'd grown an attachment to it. I don’t think that’s ever happened with a boxed cake mix.

Unfortunately, even though it's a light recipe, I think two huge pieces a day made the cake grow a bit of an attachment to us, too. Was it worth it?

You bet your (happily chubby) butt it was.


One-Bowl Chocolate Mocha Cream Cake
Cooking Light, January 2006
Yield: 16 servings

Ingredients:

Cake:
2  cups  all-purpose flour (about 9 ounces)
1  cup  granulated sugar
1  cup  packed dark brown sugar
3/4  cup  unsweetened cocoa
1 1/2  teaspoons  baking soda
1 1/2  teaspoons  baking powder
1/2  teaspoon  salt
1  cup  reduced-fat mayonnaise
3  tablespoons  canola oil
1  cup  hot strong brewed coffee
2  teaspoons  vanilla extract
1/3  cup  semisweet chocolate morsels
Cooking spray
  
Mocha Cream:
1/4  cup  boiling water
1  tablespoon  instant coffee granules
1  (7-ounce) jar marshmallow cream
1  (8-ounce) container frozen light whipped topping, thawed
1/3  cup  light chocolate syrup (such as Hershey's Lite Syrup)

Preparation:
Preheat oven to 350°.

To prepare cake, lightly spoon flour into dry measuring cups; level with a knife. Combine flour and next 6 ingredients (through salt) in a large bowl. Add mayonnaise and oil; beat with a mixer at low speed until well blended. Slowly add brewed coffee and vanilla; beat with a mixer at low speed 1 minute or until well blended. Stir in chocolate; pour batter into a 13 x 9-inch baking pan coated with cooking spray. Bake at 350° for 30 minutes or until a wooden pick inserted in center comes out clean. Cool completely in pan on a wire rack.

To prepare mocha cream, combine water and coffee granules in a large bowl; stir until granules dissolve. Add marshmallow cream; beat with a mixer at low speed until smooth. Fold in whipped topping. Spread mocha cream over top of cake; drizzle with chocolate syrup. Chill until ready to serve.

Nutritional Information: Calories: 315 (23% from fat), Fat: 8.1g (sat 3.2g,mono 2.6g,poly 1.9g), Protein: 2.6g, Carbohydrate: 60g, Fiber: 1.8g, Cholesterol: 0.0mg, Iron:1.8mg, Sodium: 390mg, Calcium: 46mg.
-----------------------------------------------------------------------------------------------------------------

Feb 17, 2010

Shrimp & Avocado Sushi


The reasons why I hate sushi: Raw fish, seaweed and mandatory one-bite-mouthfuls equal a mushy mess of foreign flavor that makes me gag.

The reason why I made sushi: The man that I love...loves it.

We never go out for sushi. Poor guy. And it was his birthday, after all. So I decided to make the one food that makes his heart pitter-patter. Even if it meant forcing a few pieces of sushi down my throat and possibly baking a back-up pizza. (Why couldn't he love steak or fried cheese, instead?)

But there was one obstacle in my way that seemed even harder than eating the sushi. And that would be making it. Sushi chefs treat the process like an art, spending years mastering their craft. And I was going to slap something together in one night? Right.

But I had a secret weapon. YouTube. There I learned how to julienne cut a cucumber, properly use nori (dried seaweed), and correctly and quickly roll the sushi so it would stay intact and look like, well, a sushi roll. Once I'd gained a bit of confidence (and a little more anxiety) I hit the store.

Thankfully, all the ingredients were stocked in Kroger's sushi department, so there was no hunting. But guess what else I found? Sushi. Tons of colorful, convenient, pre-made and perfect sushi. Some were rolled in caviar. Some were topped with fancy sauce. All of them were mocking me with their beauty.

I'm not going to lie. I pondered the benefits of buying a few boxes. After all, it was a surefire way to guarantee a disaster-free, delicious meal for Luke. But alas, where's the sentiment in grocery store sushi?  So I passed on the easy button this time. In a pouty fit I stole a few sets of complimentary chopsticks reserved for paying customers. Hey, I bought a jar of pickled ginger. Close enough.

At home, I started on the fillings. I cooked the rice, mashed the avocado and wasabi, sliced the shrimp and cucumber, chopped the cilantro and rinsed the chives. Whew.


Everything seemed pretty normal and tasty at that point and I was actually looking forward to trying the sushi. Sorta. 

Then it began. I rolled up my sleeves, set up a filling buffet, covered a bamboo place mat with plastic wrap (a must-have for sushi making if you don't own a sushi roller), and took a deep breath.


I started by breaking off one end of the nori at the perforated lines. Then I dipped my hands in ice water (to prevent sticking) and gently patted cooled rice all over the nori, except for a strip at the end farthest from me. I was careful not to smash the rice down because according to my YouTube sushi instructor, "you must respect the rice."


Next, I spread on the wasabi avocado mixture. Looks like guacamole. Tastes like something a fire-breathing dragon would cough up.


Then I arranged the shrimp pieces, cucumber slices and chives on the bottom third of the rice.


Next I lifted the bamboo mat while holding the filling in place and quickly flipped it over into a roll. Then I firmly tucked the mat under and gently pressed along the top of the roll to insure it was firm and secure. Remember how I left a little bit of nori at the end? That was so rice wouldn't squeeze out. When I released the mat....*drum roll please*...


I had a perfect sushi roll! (Well, in my non-sushi-eating opinion at least.)


And before long, I had eight perfect sushi rolls! The recipe only makes six, but I had a little extra filling, so I went ahead and made a couple more. I was sure Luke wouldn't mind.


I let the rolls sit for five minutes, then starting with a center cut, sliced them each into eight pieces. Beautiful!


A little wasabi paste and pickled ginger went on each plate, along with a small bowl of soy sauce on the side.

 
Once everything was ready, I brought in Luke. Oh, how I wish you could have seen the look on his face when he walked into the candlelit kitchen and saw the 64-piece sushi platter with all the fixings. Not to mention crab Rangoon and icy rum & Cokes. Actually, it was less of a look and more of a girlish squeal. Then an "oooh my gooooodness." Then another squeal. Then a look of confusion as if to say, "Wait...you made this?" He was in awe. So I did good, right?


Then it was time for the moment of truth. 

Luke took a bite...and loved it. He said it was just as good as a restaurant's (riiight) and even better than grocery store sushi (so glad I passed on that one).

I took a bite...and I liked it! For the first time in my life, I actually enjoyed the sushi experience. Maybe it was because it contained cooked shrimp instead of raw fish. Maybe because the flavor was much milder than authentic sushi. But I think the real reason my gag reflex wasn't activated was due to the fact that I made it myself, had become comfortable with the ingredients, and knew exactly what was inside. There were no surprises. Well, accept the surprise that I actually liked it.


Luke couldn't stop thanking me. Although, I couldn't really hear what he was saying through his sushi-stuffed praises. He was one happy husband. So happy, that I think I'll start making sushi more often. It was a lot of fun and it's just so beautiful. I'm thinking I'll start to develop a taste for it, too. 

Maybe next time I'll make one of the varieties I found on YouTube. Like the ever-so-healthy and elegant Kentucky Fried Chicken sushi roll. Now that's what I'm talkin' about!


Shrimp & Avocado Sushi
Cooking Light, January 2006
Yield: 6 servings (serving size: 8 pieces)

Cookbook Note: Using mashed avocado makes this California-style sushi easy to roll. Use precooked shrimp for an easy shortcut. Serve sushi with the typical accompaniments of wasabi, low-sodium soy sauce, and pickled ginger.

Ingredients:
2  cups  uncooked short-grain white rice
1/4  cup  seasoned rice vinegar
1  tablespoon  wasabi (Japanese horseradish)
1  avocado, peeled and mashed
1 1/2  tablespoons  finely chopped fresh cilantro
24  large shrimp, cooked, peeled, and halved crosswise (about 8 ounces)
6  nori (seaweed) sheets
12  chives
12  (7-inch-long) julienne-cut seeded peeled cucumber strips

Preparation:
Prepare rice according to package directions. Stir in vinegar; cover and cool to room temperature.

Combine wasabi and avocado in a small bowl, and set aside. Combine cilantro and shrimp in another small bowl; toss well.

Cut off top quarter of nori sheets along short end. Place 1 nori sheet, shiny side down, on a sushi mat covered with plastic wrap, with long end toward you. Pat 3/4 cup rice mixture evenly over nori with moist hands, leaving a 1-inch border on one long end of nori. Spread 1 tablespoon avocado mixture over rice.

Arrange 8 shrimp pieces, 2 chives, and 2 cucumber strips along bottom third of rice-covered nori.

Lift edge of nori closest to you; fold over filling. Lift bottom edge of sushi mat; roll toward top edge, pressing firmly on sushi roll. Continue rolling to top edge; press mat to seal sushi roll. Let rest, seam side down, for 5 minutes. Slice crosswise into 8 pieces. Repeat procedure with remaining nori, rice mixture, avocado mixture, shrimp mixture, chives, and cucumber.

Nutritional Information: Calories: 365 (16% from fat), Fat: 6.5g (sat 1g,mono 3.4g,poly 1g), Protein: 13.2g, Carbohydrate: 60.3g, Fiber: 3.9g, Cholesterol: 57mg, Iron: 4.3mg, Sodium: 311mg, Calcium: 35mg.
-----------------------------------------------------------------------------------------------------------------