Dec 29, 2009

Three-Cheese Pizza w/ Mushroom & Basil


Long gone are the high heel-clad nights sipping appletinis with my sorority sisters. Slowly but surely, bouncers have been replaced with supermarket baggers. Trendy hairstyles and strappy little dresses have morphed into ponytails and elastic waistbands. And that heart-pounding dance floor has been swapped out for a worn seat on the couch. It’s called married life, and it didn’t take long for me to realize that in this world, Fridays nights are reserved for grocery shopping, sweatpants and pizza.

But don’t mistake my sarcasm for complaining. As cliché as it sounds, I wouldn’t change a thing. Especially not the pizza part. Meat. Cheese. Dough. A balanced meal if you ask me. Add in an ice cold Coke, a movie and a foot massage if I’m lucky, and you’ve got my most anticipated night of the week.

The Friday before Christmas, in all its chaos, was no exception. I was once again craving an easy dinner, with the added challenge of using up leftover basil from the champion chicken parmesan and some mushrooms I never got around to stuffing. As you can see, victory was mine when I stumbled upon this perfect recipe. When you want something fast, nothing beats pre-made crust and jarred sauce.
   
I wanted to make enough for the weekend, so I doubled the recipe, making two mini pizzas and one large thin crust. But really, the only time consuming step was slicing the mushrooms, which can totally be avoided if you buy the pre-sliced variety like the recipe instructs. After a little sautéing, I started the layering. 


Sauce.


Dollops of ricotta and Parmesan.


Sautéed  mushrooms.


Oh, and I added a little bacon. You know, for protein.


Handfuls of mozzarella.


Then I tossed them in the oven and poured a couple drinks while Luke put in the movie and set up makeshift tables in front of the TV. When the pizzas were bubbly and golden, I sprinkled them with fresh basil, sliced them, and headed into the living room to become a sauce-faced zombie for 90 minutes. Nothing more beautiful than the soft glow of Hollywood illuminating a homemade pie.


Oh my goodness was this pizza good. Homemade pizza has a tendency to be bland and generic, but this was great. The ricotta and basil really made it taste fancy and the sautéed mushrooms were awesome. Far better than frozen pizza. Far less greasy than delivery. Far cheaper than going out.

And as for going out, I was far happier sitting on the couch with my man and a belly full of cheese and bacon. Life is good.


Three-Cheese Pizza w/ Mushroom & Basil
Yield: 4 servings (serving size: 2 slices or 1/4 of pizza)

Cookbook Note: Use a teaspoon to evenly dollop the ricotta-Parmesan mixture over the sauce.

Ingredients:
Cooking spray
1  (8-ounce) package presliced mushrooms
1/2  cup  part-skim ricotta cheese
1/4  cup  (1 ounce) preshredded fresh Parmesan cheese
1  (10-ounce) Italian cheese-flavored pizza crust (such as Boboli)
1  cup  chunky vegetable pasta sauce (such as Ragu)
1/2  cup  (2 ounces) preshredded part-skim mozzarella cheese
2  tablespoons  thinly sliced fresh basil
(I also added about 6 slices of that pre-cooked boxed bacon, chopped)

Preparation:
Preheat oven to 450º.

Heat a large nonstick skillet coated with cooking spray over medium-high heat. Add mushrooms; sauté 5 minutes. Remove from heat.

Combine the ricotta and Parmesan cheeses. Place the pizza crust on a baking sheet. Spread the pasta sauce over crust, leaving a 1-inch border. Dollop ricotta cheese mixture evenly over the sauce, and top with mushrooms. Sprinkle with mozzarella. Bake at 450º for 12 minutes or until crust is crisp. Sprinkle with basil, and cut into 4 wedges.

Nutritional Information: Calories: 356 (26% from fat), Fat:10.1g (sat 4g,mono 1.8g,poly 0.2g), Protein: 19.4g, Carbohydrate: 42g, Fiber: 2g, Cholesterol: 21mg, Iron: 2.2mg, Sodium: 1033mg, Calcium: 445mg.

Source: Cooking Light, September 2003

Dec 21, 2009

Chocolate Mint Bars


Dear over-priced Fannie May Mint Meltaways, Girl Scout make-you-fat Thin Mints, and mass-produced, same-old-taste peppermint patties,

You may all have the “chocolate mint thing” down, but I have the homemade-less-calorie-yet-indulgently-amazing chocolate mint thing down, all sitting on top of a fudgy sticky brownie.

No hard feelings, but, I win.

I never thought homemade brownies could get any better than the cream cheese brownies I made awhile back. C'mon, cheesecake on top of brownies? How do you beat that? Well, with mint, my friends. There's a reason the aforementioned candies had a good run. Mint and chocolate are made for each other.

Although the three layers make these bars a touch more time consuming than Betty’s box-o-powder, they’re very easy to make. And trust me, you can definitely make time for layers. You need to make time for layers.

First up was the brownie layer, which calls for an entire can of chocolate syrup. Entire. Can. You must remain calm and resist the temptation to dip your fingers, pour even a teaspoon on your tongue, or to you serious chocolate lovers, flat out drink it straight. No, you'll want every last drop to make it into the bowl so your brownies will become the fudgy dream bars they’re meant to be.


Now, you can switch out the bottom layer with your favorite boxed mix if you’re in a hurry or prefer a more cake-like consistency. But make sure it’s not an ultra sweet brownie, because the topping is sugary enough to make even your sweet tooth ache.

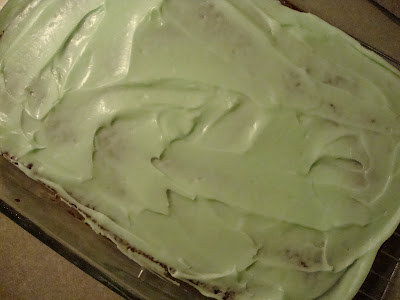
After mixing the batter, I baked the brownies, let them cool, and made the buttery, sweet, minty layer. Not much more to say. It whipped up quick and glided on easy.


I made the final layer by melting together chocolate chips and butter. That's right. Isn't the photo below just a beauty? I might just stick it in my wallet. I smudged the mint layer a bit while spreading the chocolate on top, so if when you make these, keep a good amount of chocolate on your spatula until it’s covered. Oh, and the recipe suggests using dark chocolate for a "grown up taste." I couldn't find any dark chips, but I must say, they'd probably make this dessert even more addictive.


The final, hardest, most agonizing step was waiting for my creation to chill in the fridge. You really need to let it sit for a while (overnight or at least a few hours) so the layers can set and meld together. And when you do take them out, make sure you cut them right away. (As time passes, the chocolate layer hardens and it’ll crack if you try to cut it.)


They’re amazing. Very fudgy, and very sweet. So sweet, in fact, that when I tried my first one, I had to push my plate away after just a few bites. Ok, so I eventually ate the rest. But I recommend cutting them even smaller than the recipe calls for. Their rich and indulgent nature makes them the perfect little bite-sized treats. Or, just slap on your sweats, cut a huge slab and eat it in shifts. No judging here.

And because they’re minty, you can easily rationalize having one for dessert, and then another as your after dinner mint. Maybe even two if your meal contained garlic. And personally, I love them so much that if you ever stay as a guest at our place, don’t be surprised when you find a gooey chocolate mint brownie on your pillow.


Chocolate Mint Bars
Yield: 20 servings (serving size: 1 piece)

Cookbook note: The dense base layer is like a rich, fudgy brownie, so don't overcook it or the dessert bars will be dry. Refrigerating the mint bars allows the chocolaty top layer to set properly. You can make the dessert up to one day ahead. For a more grown-up taste, you can also use dark chocolate chips for some or all of the semisweet chocolate chips in the glaze.

Ingredients

Brownie layer:
1  cup  all-purpose flour (about 4 1/2 ounces)
1/2  teaspoon  salt
1  cup  granulated sugar
1/2  cup  egg substitute
1/4  cup  butter, melted
2  tablespoons  water
1  teaspoon  vanilla extract
2  large eggs, beaten
1  (16-ounce) can chocolate syrup
Cooking spray
   
Mint layer:
2  cups  powdered sugar
1/4  cup  butter, melted
2  tablespoons  fat-free milk
1/2  teaspoon  peppermint extract
2  drops green food coloring
  
Glaze:
3/4  cup  semisweet chocolate chips
3  tablespoons  butter

Preparation:
Preheat oven to 350°.

To prepare bottom layer, lightly spoon flour into a dry measuring cup; level with a knife. Combine flour and salt; stir with a whisk. Combine granulated sugar, egg substitute, 1/4 cup melted butter, 2 tablespoons water, vanilla, eggs, and chocolate syrup in a medium bowl; stir until smooth. Add flour mixture to chocolate mixture, stirring until blended. Pour batter into a 13 x 9–inch baking pan coated with cooking spray. Bake at 350° for 23 minutes or until a wooden pick inserted in center comes out almost clean. Cool completely in pan on a wire rack.

To prepare mint layer, combine powdered sugar, 1/4 cup melted butter, and next 3 ingredients (through food coloring) in a medium bowl; beat with a mixer until smooth. Spread mint mixture over cooled cake.

To prepare the glaze, combine the chocolate chips and 3 tablespoons butter in a medium microwave-safe bowl. Microwave at HIGH 1 minute or until melted, stirring after 30 seconds. Let stand 2 minutes. Spread chocolate mixture evenly over top. Cover and refrigerate until ready to serve. Cut into 20 pieces.

Nutritional Information: Calories: 264 (30% from fat), Fat: 8.7g (sat 5.2g,mono 2.5g,poly 0.4g), Protein: 2.8g, Carbohydrate: 45g, Fiber: 0.5g, Cholesterol: 38mg, Iron: 0.9mg, Sodium:139mg, Calcium: 12mg.

Source: Cooking Light, March 2008

Dec 20, 2009

Champion Chicken Parmesan


The reason this recipe’s title has the word “champion” in it, is because that’s what you feel like when you’re done making it. A dead-tired, garlic-reeking champion on the brink of starvation, who wants nothing more than to stuff her face with something, anything, and somehow get back those precious hours spent chopping mountains of peppers.

Needless to say, it was another long night. I had an inkling it would be, with a homemade sauce and high maintenance chicken ahead of me. Add to that a doubled recipe (my logic says hours of hard work should reap more than four measly plates of food), and plans to deep clean the entire apartment, do five loads of laundry, wash and put away a trunk of old dishes, practice the violin, and um, relax. All of which, on this particular day, didn’t start until mid-afternoon.

What was I thinking? Probably something along the lines of "If that red-headed robot super wife on Desperate Housewives can do it, so can I." I watch too much TV.

So to make up for lost time, my plan is to keep this post as short as possible and just let the pictures do the talking. Ladies and uh, ladies, I give to you: The very time consuming Champion Chicken Parmesan, condensed.

The situation.
I started on everything at once. Laundry was in. Cleaning had begun. Dishes were soaking. And I even got in a few moments of horrendous violin screeching before I locked myself in the kitchen.

The sauce.
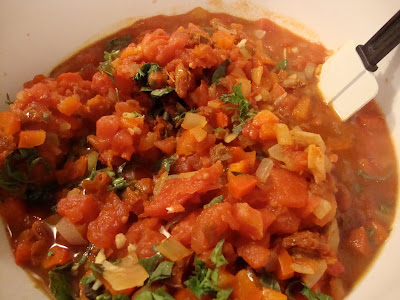
While I could have swapped out the homemade recipe for a more convenient, sanity-saving jar of Prego, I was determined to make it as is. So while the sun-dried tomatoes were soaking, I started chopping. And I didn’t stop until my eyes were burning and my table was overflowing with heaps of chopped peppers, onion, garlic and herbs. Oh time-saving food processor, where art thou?


But by some miracle, it all (just barely) fit into my pan, even when I added the four cans of diced tomatoes. And oh how lovely it smelled simmering. Maybe just good enough to overlook the dishtowel-staining mess I made transferring my leaning tower of sauce to a dish to keep warm.


The chicken.
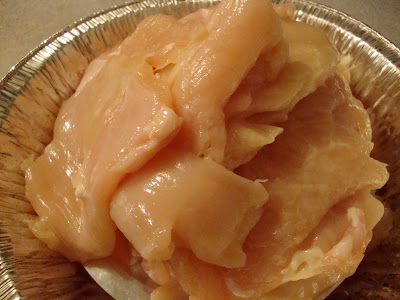
Eight pieces of chicken = eight late-night neighbor-disturbing pounding sessions (sorry!) followed by a quick break to fold the laundry, finish the cleaning, and set the table (with my mom's lovely blue dishes I had been washing all day). Then I was back in the kitchen to coat the chicken and fry them with love. And olive oil.


I was beginning to see the light. I placed my crispy beauties in baking dishes, covered them with sauce and mozarella, popped them in the oven, and in sheer exhaustion, slumped in my chair and stared blankly into the distance while Luke, tiptoeing on eggshells, poured me a glass of wine and tossed together a quick salad. Whew.


The finish line.
I’m not usually a fan of chunky tomato sauce, and I normally would be reluctant to eat a less-breaded version of such an already perfect dish. (It calls for no breadcrumbs. Did you hear me? None.) But it was delicious.

The red pepper, fresh basil and sun-dried tomatoes really gave it a fancy taste. And you just can’t say anything bad about tender juicy chicken smothered in cheese and homemade sauce. Although next time, I may turn to the jar and just add a few sautéed sun-dried tomatoes and peppers on top. It’s not like the made-from-scratch police are going to come and get me.

A few things to remember:

1. Don’t put all the sauce on the chicken, just a little. This will keep the chicken crispy. Keep the rest warm to pour over the linguine.

2. A little extra grated parmesan and fresh basil will make it look pretty at the end.

3. Don’t forget the garlic bread. Seriously. Something has to counteract that no breadcrumbs thing.


The victory.
As for me, I surprisingly managed to finish everything. The laundry. The cleaning. Everything. Well, except for the relaxing part. But you know what? Enjoying my delicious, homemade meal was well worth skipping an hour of being a TV drone, even if I did scarf if all down in around 2.5 seconds. Pretty good stats for a champ if you ask me.


Champion Chicken Parmesan
Yield: 4 servings
(serving size: 1 chicken breast half, 1 cup sauce, 1/4 cup cheese, and 3/4 cup pasta)

Cookbook Note: Try Asiago or provolone cheese in place of the mozzarella.

Ingredients

Tomato sauce:
1  ounce  sun-dried tomatoes, packed without oil (about 1/4 cup)
1  cup  boiling water
1  teaspoon  olive oil
2  cups  chopped red bell pepper
1  cup  chopped onion
2  (14.5-ounce) cans diced tomatoes, undrained
1/4  cup  chopped fresh parsley
2  tablespoons  chopped fresh basil
1  tablespoon  balsamic vinegar
1/4  teaspoon  black pepper
2  garlic cloves, minced
  
Chicken:
1/4  cup  all-purpose flour
1/4  cup  grated Parmesan cheese
1/4  teaspoon  black pepper
4  (4-ounce) skinned, boned chicken breast halves
1  large egg white, lightly beaten
1  tablespoon  olive oil
Cooking spray
1  cup  (4 ounces) shredded part-skim mozzarella cheese
3  cups  hot cooked linguine (about 6 ounces uncooked pasta)

Preparation:
To prepare tomato sauce, combine sun-dried tomatoes and water in a bowl; cover and let stand 30 minutes or until soft. Drain and finely chop tomatoes.

Heat 1 teaspoon olive oil in a large saucepan over medium-high heat. Add sun-dried tomatoes, bell pepper, and onion; sauté 7 minutes. Stir in canned tomatoes; bring to a boil. Cover, reduce heat, and simmer for 10 minutes. Remove from heat; stir in parsley, basil, vinegar, 1/4 teaspoon black pepper, and garlic.

Preheat oven to 350°.

To prepare chicken, lightly spoon flour into a dry measuring cup; level with a knife. Combine flour, Parmesan, and 1/4 teaspoon black pepper in a shallow dish. Place each breast half between 2 sheets of heavy-duty plastic wrap; flatten to 1/4-inch thickness using a meat mallet or rolling pin. Dip each breast half in egg white; dredge in flour mixture. Heat 1 tablespoon oil in a large nonstick skillet over medium-high heat. Add chicken; cook 5 minutes on each side or until golden. Arrange in a 13 x 9-inch baking dish coated with cooking spray. Pour the tomato sauce over the chicken. Sprinkle with mozzarella. Bake at 350° for 15 minutes. Serve over linguine.

Nutritional Information: Calories: 559 (26% from fat), Fat: 15.9g (sat 5.6g,mono 6.3g,poly 2g), Protein: 46.3g, Carbohydrate: 58.1g, Fiber: 6.4g, Cholesterol: 93mg, Iron: 6.1mg, Sodium: 792mg, Calcium: 359mg.

Source: Cooking Light, October 2000